Overview of your Yetti wheelhouses’ wheel rims, tires, wheel bearings, and lug nuts.
Wheel Rims:
If your wheelhouse has been struck or impacted, on or near the wheels, or if the wheelhouse has struck a curb, inspect the rims for damage. Replace any damaged wheel. Inspect the wheels for damage every year, even if no obvious impact has occurred.
Tires:
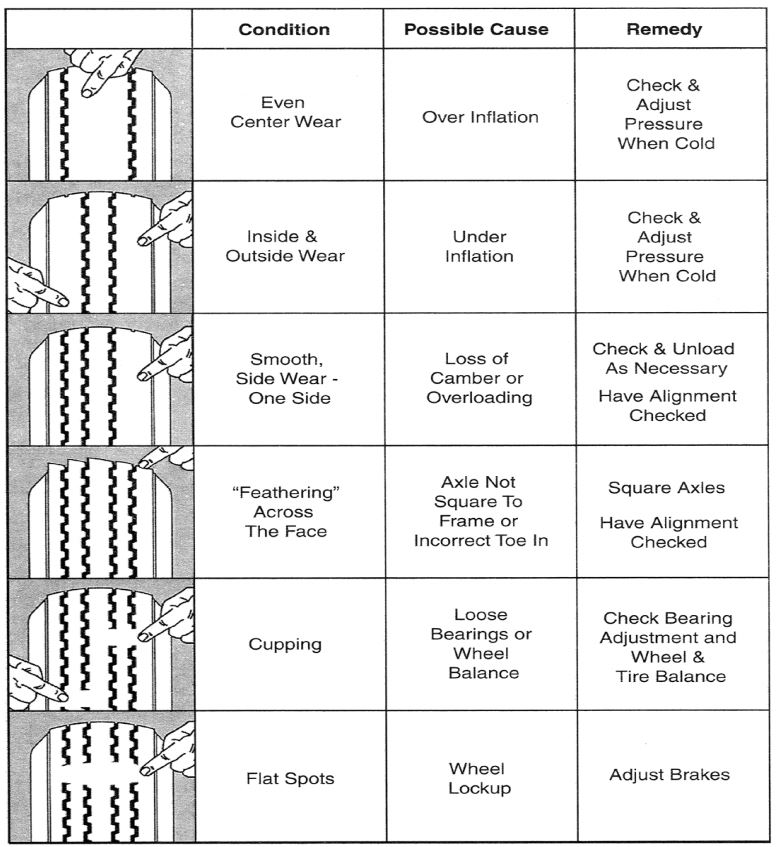
Before each tow, check the tire pressure to make sure it is at the level indicated on the tire sidewall or VIN label. Tire pressure must be checked while the tire is cold. Do not check tire pressure immediately after towing the wheelhouse. Allow at least three hours for the tires to cool, if the wheelhouse has been towed for as much as one mile. Tires can lose air over a period.
Replace the tire before towing the wheelhouse if the tire treads have less than 2/32-inch depth or the telltale bands are visible.
A bubble, cut or bulge in a sidewall can result in a tire blowout. Inspect both sidewalls of each tire for any bubble, cut or bulge; and replace a damaged tire before towing the wheelhouse. If you are storing your wheelhouse for an extended period, make sure the tires are inflated to the maximum rated pressure indicated on the sidewall or VIN label and that you store them in a cool, dry place such as a garage. Use tire covers to protect the tires from the harsh effects of the sun.
Wheel Bearings:
A loose, worn or damaged wheel bearing is the most common cause of brakes that grab. To check your bearings, jack up the wheelhouse and secure it on adequate capacity jack stands. Check wheels for side-to-side looseness.
If the wheels are loose or spin with a wobble, the bearings must be serviced or replaced. If your axle(s) are equipped with a grease zerk on the ends of the axle(s), the bearings must be greased every 6 months or 6,000 miles to ensure reliable and safe operation of your wheelhouse.
1. Remove the rubber plug from the axle end.
2. Place the grease gun on the zerk.
3. Pump grease until new grease begins to appear. Use a different color grease each time so
you will know when the new grease begins to appear.
4. Install rubber plug and cap. Repeat for remaining wheel bearings. If your wheelhouse axle(s) are not equipped with grease zerks, refer to the axle manufacturer for service information.
For even more detailed instructions and a video tutorial, check out this post in the Owner Guide called, Maintenance: Wheel Bearings.
Lug Nuts:
Lug nuts or bolts are prone to loosen right after a wheel is mounted to a hub. When driving on a remounted wheel, check to see if the lug nuts or bolts are tight after the first 10, 25, and 50 miles of driving, and before each tow thereafter.
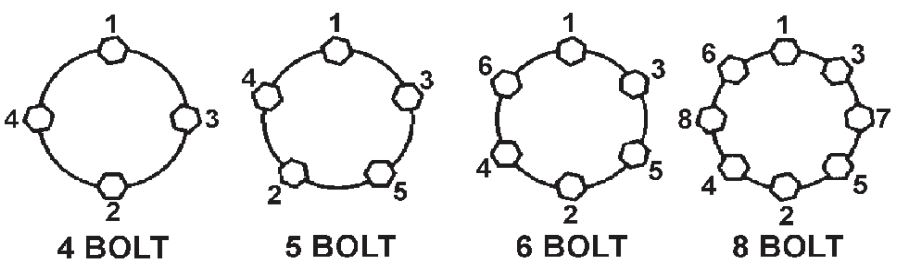
Tighten the lug nuts or bolts in three stages to the final torque for the axle size on your wheelhouse, to prevent wheels from coming loose. Tighten each lug nut or bolt in the order shown in the following figure. Use a calibrated torque wrench to tighten the fasteners. Verify that wheel studs are free of contaminants such as paint or grease, which may result in inaccurate torque readings. Overtightening will result in breaking the studs or permanently deforming the mounting stud holes in the wheels and will void the axle warranty.
[Voyager Industries, Inc.] recommends a wheel nut torque of 100 – 110 ft/lbs.
WARNINGS:
- Metal creep between the wheel and rim and lug nuts or bolts can cause the rim to loosen.
- Death or serious injury can occur if the wheel comes off.
- Tighten the lug nuts or bolts before each tow.
- Check your tires before each tow
- Lug nuts or bolts are prone to losing after being first assembled. Death or serious injury can result.
- Check lug nuts or bolts for tightness on a new wheelhouse, and after re-mounting a wheel at 10, 25, and 50 miles.
For more information on the key points of all the exterior inspection items check out this breakdown of Exterior Inspection Instructions in the Owners Guide.
For more information on performing inspections for your Yetti wheelhouse check out this information in the Owners Guide: Exterior Inspection Schedules & Checklists.
Failure to properly maintain and service your Voyager equipment may result in personal injury and may void any manufacturer warranties. Please contact your local dealer with any service, maintenance, or warranty questions.
View Owners Guide Blog: ARCHIVE